| |
|
 |
INSTRUCTION FOR THE JAPANŃĆĆPUNCH |
||
|
||
| 2 Thread Have floss ready for embroidery by separating colored braid.Separate end of braid and pull at a loose strand.The braid will separate into a curly floss. |
||
 |
||
| 3 Threading Needles Insert end of curly floss through the hole at the bottom end of needle and to the side slot.Secondly,thread through the needle eye from groover side and firmly hold both ends of floss. Pull till floss snaps into recess of needle. (If necessary,allow the needle to slide up and down over the floss before it is completely recessed.) Likewise,the embroidery will not stay unless floss return inside the needle at all times. |
||
 |
||
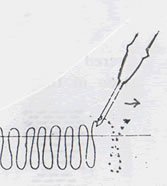
| 4 Sttich Start embroidering by holding needle similar to pencil writing. The grooved side of needle must take toward direction of work. Propelry insert needle fully deep enough in order for stitches stay firmly. Carefully remove the needle from fabrics as you pull it in a slow motion ane gently pull the thread,then slide the point across the fabric for the next insertion. It is also not necessary to tie into a knot-loose ends of necess thread.Just simply cut thread on work surface. Caution Stiches are easily removed without further damage to fabric or thread,therefore it is suggested to practice in the inside od design until you acquire a flexible grips. |
||
 |
||
|
||
| 6 Fluffing Before starting fluffin arrange the stitches on the reverse side of the pile by applying a amount of glue evenly on the stitches surface.This procedures will prevent the pile loops from separation when fluffing. To achive the effectiveness when fluffing.Brush the piledstiches wish a wire brush.Begin brushing the pile in all direction until the floss become larger and silky. The finishing touch should be brush lightly and evenly in the direction of the natural lie of the pattern design. |
||
 |
||
| 7 Running Stitches The stamped side of the fabric will be the finished side,threfore be careful so the fabric will not appear between stiches. Arrange long and short stitches over the area to be covered and be sure to run your stitches in the natural direction of the design. |
||
 |
||
| 8 Suggestion Onec you become familiar with your new craft,you will develop your own methods and skills. Here are some helpful suggestion for all beginners. A.It is always advisable to start as near the center as possible of your design and work toward the edges. This will eliminate the possibility of the completed section from coming apart. B.When shading of colors is perfomed,make sure to utilize some of your stiches into the C.In order to achieve a better contrast in colors when shanding,begin with the lightest color and proceed to the darkest one. D.To work and accomplish a dimensional effect for high light,stitch the surface twice making sure your bottom layer runs opposite the finished top layer. E.If you wish to add a fleck of colors,you may stitch from the reverse side of the fabric. |
||
| Should you have any questions,do not hesitate to contact us at iwase012@eos.ocn.ne.jp Looking forward to welcoming your contact. Thank you! |
||